I've been seeing a lot of guides for temperature afghans and think this is a great idea. What you do is crochet a row on an afghan and use the temperature outside as the guide for the color. What you end up with is a record of the temperature during the year, and a lovely scrap afghan. But what if you live in hot climates like Florida? The guides that are out there would make your afghan all one set of colors like reds and oranges.
Well you know me, I get a wild hair and have to create something to meet a need I think is out there. So I've come up with a Florida Temperature Guide for an afghan, but it can be used for any warm climate, not just Florida. I hope this helps my fellow crochet artists who live in warmer climates. If you use this or come up with one of your own, I'd love to see your afghans as you work on them so be sure to come to my Facebook page and post your pics!
Thursday, December 31, 2015
Free Books! Yes I Said Free!
Hello and Happy New Year to one and all! To ring in the new year how about some free ebooks? You may know I write crochet and knitting books under a pen name for a client. Right now several of them are free on Amazon and I just had to share this good news with all of you. Check them out, and if you get some (I hope you get them all...) please leave a comment for me. Comments really help other folks pick out the right books.
The Almanac of Crochet by Dorothy Wilks
The Encyclopedia of Crochet by Florence Schultz
The Almanac of Crochet by Dorothy Wilks
The Encyclopedia of Crochet by Florence Schultz
The Complete Handbook on How to Crochet and Knit by Florence Schultz
The Complete Beginners Guide on How to Crochet and Knit by Florence Schultz
I'll keep you posted when more of my books go on sale or are free. These offers are good through January 1st or 2nd depending on the set you choose. I hope you enjoy them and learn from them. Please feel free to offer me any comments or questions, I always love to hear from my readers.
Happy New Year!
Sunday, December 6, 2015
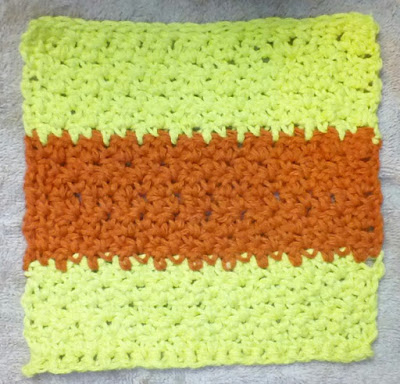
Seed Stitch Dishcloth
I really like making my own dishcloths and washcloths. Not only are they fun and quick to crochet up, but I think they are much thicker and softer than store bought versions. You can also crochet them up in your favorite colors, and give them as thoughtful gifts.
Today I'm sharing a very easy pattern. I've used two colors, but you can just use one, or use as many as you like. The finished dishcloth measures about 7 inches wide and 6 1/2 inches long. The gauge is 20 stitches and 19 rows per four inches using a size G/4.25mm hook. The gauge really isn't that important for this pattern, and you can use a larger or smaller hook if you'd like a looser or tighter fabric.
Materials Needed
2 balls of cotton yarn; I used Premier Home yarn in Sunshine (Color A) and Orange (Color B)
Size US G/4.25mm crochet hook and a tapestry needle
Special Stitches
Single Crochet Foundation Chain: Chain 2, insert the hook into the first chain, yarn over and pull through. Yarn over and pull through the first loop on the hook. This creates the chain stitch you will need to begin the next stitch. Yarn over and pull through the 2 loops on the hook.
Begin the next stitch by inserting the hook under the 2 loops of the chain stitch you created with the first step of the last stitch. Yarn over and pull through the loop on the hook (I find it helpful to grab the chain stitch so I know exactly where to insert the hook for the next stitch), yarn over and pull through the last 2 loops on the hook.
Notes
As you work the pattern the double crochet stitches are worked into the single crochet stitches of the previous row, and the single crochet stitches are worked into the double crochet stitches of the previous row. You can make the dishcloth any width as long as your foundation chain is an even number of stitches.
Pattern
With Color A crochet 20 single crochet foundation chains
Row 1: ch1 *dc into the next st, sc into the next st* rep across ending with a sc into the last st
Row 2; ch3 *sc into the next st, dc into the next st* rep across ending with a sc into the last st
Rows 3-10: Repeat Row 2, change to Color B at the end of Row 10, fasten off Color A
Rows 11-20: With Color B repeat Row 2, change to Color A at the end of Row 20, fasten off Color B
Rows 21-30: With Color A repeat Row 2, fasten off and weave in tails
Edging (Optional)
I didn't crochet an edging on this dishcloth, but if you want to add an edging turn your work at the end of Row 30 and chain 1. Single crochet across the top and work 3 sc into the corner. Single crochet evenly along the side and work 3 sc in the corner. Single crochet across the bottom, sc 3 into the corner and single crochet evenly along the side. When you reach the last corner work 2 sc into the corner and join in chain 1.
You can now crochet another round of single crochet, or crochet a decorative edging if you'd like.
That's it! Now you can enjoy your new dishcloth. Let me know in the comments if you have any questions or comments about this pattern. Have fun!
Saturday, September 12, 2015
Happy International Crochet Day!
Today is International Crochet Day! I know it's late in the day, it's nearly 11 pm here in Central Florida, but I wanted to wish everyone a great day hooking. For me, crochet is a way to not only create beautiful and often useful things, but it's also a way for me to connect with the women in my family. My grama, mom, and aunt all crocheted. It was a craft handed down to me at an early age. I remember learning how to crochet when I was around 9 years old. Now I even design my own patterns and share them on this blog and in my ebooks I write under Dorothy Wilks and Cynthia Welsh.
My grama could crochet the most beautiful borders on her embroidery. She used variegated crochet thread and tiny steel needles. I always admired her work. My mom was more into knitting. She could knit anything. I remember matching sweaters she knitted for her and my dad. They had a totem pole kind of design. I saw an example of them not too long ago and they were called "Bob Hope" sweaters. Amazing design. I do knit, but I'm still in the beginner stage. I have learned to enjoy it and I like to practice at it, but crochet is my real love.
Crochet helped me through the grief of losing my husband suddenly in 2011 after 18 years of marriage. Later that same year my mother fell ill and died in December just after her 83rd birthday. It was a hard time for myself and my kids both emotionally and financially. Crochet helped me keep my sanity and opened the door for me to be hired to write ebooks for a client under three different pen names. I am blessed to be able to crochet and write books to help supplement my disability.
So what does crochet mean to you? Share with us in the comments your story about how crochet adds to your life. Remember one stitch and one day at a time.
Happy Hooking my friends!
 |
| Darling Daughter Beanie |
My grama could crochet the most beautiful borders on her embroidery. She used variegated crochet thread and tiny steel needles. I always admired her work. My mom was more into knitting. She could knit anything. I remember matching sweaters she knitted for her and my dad. They had a totem pole kind of design. I saw an example of them not too long ago and they were called "Bob Hope" sweaters. Amazing design. I do knit, but I'm still in the beginner stage. I have learned to enjoy it and I like to practice at it, but crochet is my real love.
 |
| Very similar design from my mom's sweater |
Crochet helped me through the grief of losing my husband suddenly in 2011 after 18 years of marriage. Later that same year my mother fell ill and died in December just after her 83rd birthday. It was a hard time for myself and my kids both emotionally and financially. Crochet helped me keep my sanity and opened the door for me to be hired to write ebooks for a client under three different pen names. I am blessed to be able to crochet and write books to help supplement my disability.
So what does crochet mean to you? Share with us in the comments your story about how crochet adds to your life. Remember one stitch and one day at a time.
Happy Hooking my friends!
Tuesday, July 21, 2015
Win Yarn and Support Pacifica Yarn Company
Johnny and his gang at New Stitch a Day are launching a new yarn company called Pacifica Yarn Company and a store called Argyle Sheep. This yarn will be made with all USA produced fibers and they are trying to raise enough cash to get their company off the ground.
You can win $300 worth of products by just clicking the contest link. Learn more about their efforts here. Watch the video here.
Good luck and while you're at it don't forget to throw a few bucks their way! They have lots of sponsorship levels for every budget.
You can win $300 worth of products by just clicking the contest link. Learn more about their efforts here. Watch the video here.
Good luck and while you're at it don't forget to throw a few bucks their way! They have lots of sponsorship levels for every budget.
Sunday, July 5, 2015
Deal of the Day!
Hello all! I had to write a post and tell you about some of the best yarn I found for the money. Premier Home cotton/polyester yarn is soft, has vibrant colors, and is so easy to work with! Right now it's on sale at Craftsy for only 95 cents a ball. I ordered some last time it was on sale and I received my yarn in not time, and one thing I like about ordering from Craftsy is they don't kill you with shipping charges.
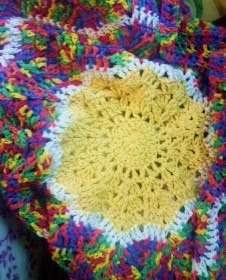
Here is a pic of the Rainbow Ripple Baby Afghan from Raverly that I just completed made with this great yarn.
Here is a pic of the Rainbow Ripple Baby Afghan from Raverly that I just completed made with this great yarn.
I used Premier Multi in Rainbow and Lily Sugar 'n Cream in Sunshine and white. The afghan is soft and the colors are really pretty. I have some in Valentine and I'm waiting for Fuschia and Off White to make another one. I'm making this for a dear friend's granddaughters so I want something they can keep for many years.
Check out the sale and let me know if you order any. Also share your projects on my Facebook group so we can all see your handy work. If you haven't liked my page yet, go there and show me some love.
Until next time be blessed and be safe!
Friday, June 19, 2015
Ribbed Cable Crochet Hook Case
Hello! I know I haven't posted anything in quite a while, sorry about that! I've been working on lots of ebooks under the names Dorothy Wilston and Cynthia Welsh. They are available on Amazon.com for pretty good prices, so please check them out.
For one of the books I made a pretty bag to hold one of my works in progress. The problem was I didn't think about carrying along the hook and little plastic bullet case for my tapestry needles. Today I came up with a small hook case that will carry a few hooks, my tapestry needles, and a small pair of fold up scissors.
I used some scrap cotton yarn I had on hand from my projects so you can use just about any yarn you like as long as the stitches are fairly tight so your hook doesn't slide out. I also used some old buttons I had in a tin of my mother's, so feel free to use your favorite buttons or sew a strip of Velcro across the underside of the flap.
Here is the pattern, I hope you like it. If you find any mistakes please let me know in the comments.
Supplies: Lily
Sugar ‘n Cream cotton yarn in Purple (A) and White (B), a size US G/6 (4.25mm)
crochet hook, 2 1 inch buttons, sewing needle, sewing thread, and a tapestry
needle.
Front Post Half
Double Crochet (fphdc): Yarn over
and insert hook from the front around the post of the stitch 2 rows below, yarn
over and pull around post, pull stitches up even with the active row, yarn over
and pull through all 3 loops on the hook. Count the stitches behind the fphdc
stitches to find the next stitch to work into.
Changing Colors: Do
not fasten yarn off, work the last stitch of the row until you have 3 loops on
the hook, draw new color through these 3 loops. Capture old color in the first
chain stitch of the next row to carry the colors up the side of the fabric.
Front
With Color A ch 25
Row 1: sc into 2nd ch from hook, sc across, turn
Row 2: ch1, sc across row, turn
Row 3: ch2, hdc *fphdc into the st 2 rows below in each of
the next 2 sts, hdc into next 2 sts* repeat across ending with a hdc into each
of the last 3 sts, turn
Row 4: With Color B ch2, hdc across, turn
Row 5: ch2, hdc *fphdc into the st 2 rows below in each of
the next 2 sts, hdc into next 2 sts* repeat across ending with a hdc into each
of the last 3 sts, turn
Rows 6-9: Repeat Rows 4 & 5 changing colors every 2 rows
Row 10-13: With Color A ch2, hdc across, turn, fasten off
after Row 13
Attach Color B onto Row 13
Row 14-17: ch1, sc across, turn, fasten off and weave in tails.
Back
With Color B chain 25
Row 1: sc in 2nd ch from hook, sc across, turn
Row 2: ch1, sc across, turn
Row 3-9: ch2, hdc across, turn
Row 10: ch1, sc across, turn, fasten off, weave in tails.
Assembly
With wrong sides held together whip stitch around the sides
and bottom of the case to sew together.
Sews buttons on the back side of the case.
Lining
Lining the case is optional, but it will keep your hooks
from sliding out between the stitches. What I did wasn’t very scientific, but
it worked. I cut a piece of fabric about 2 inches larger than the inside of the
clutch. (Granted this step would have been much easier if I had done it before
I sewed the bag together.)
Next I put the material inside the bag and turned
the edges under. I then folded the side edges under the top edge of both side
so that I didn’t have to seam up the sides of the lining. I used the
blanket stitch around the top of the lining fabric catching the inside loop of
a stitch on the inside of the bag all of the way around the top of the bag. I
used embroidery floss because it matched the fabric perfectly, but you can use
regular sewing thread if you like.
You can also whip stitch the lining into
place, or if you want you could even use a machine to stitch the lining into
the bag. You could also turn the bag inside out and stitch the side seams
together, but I didn’t do this step as I think the folded fabric will be just
fine. But I may stitch it together later if I find things are sliding out
through the folds.
I set the fabric in
the bag and folded over the edges and pinned it into place. I trimmed the top
edge and left 2 inches for folding over.
Fold the sides under
the top of the lining and pin in place.
Lining all pinned in
place and ready to sew.
To sew the blanket
stitch insert the needle into a loop on the wrong side of the crochet fabric,
through the material, and then pull the needle through the large loop formed by
the thread.
All done!
Feel free to sell anything you make with this pattern, but if you want to share this pattern please share the link of this blog or the link on Raverly. Thanks in advance for respecting my efforts as a designer.
Subscribe to:
Posts (Atom)

