I used 2 strands of Premier Home cotton/polyester yarn and a size J crochet hook. You can use any type of yarn you like, but I had a bunch of odds and ends in my stash and wanted to use them up. I like the variegated look the different colors create, but you can use one or as many colors as you like.
Odds and Ends Basket
You will need: 2 balls of yarn (or a bunch of odds and ends from your stash), a size J hook, and a tapestry needle to weave in the ends.
Notes: I used a magic ring to begin the project and an invisible join. I've included a tutorial for both techniques at the end of the pattern.
To begin hold 2 strands of yarn together and create a magic ring. Chain 1, sc 8 into the ring, close it up and slip stitch into the chain 1 to join.
Round 1: ch1, sc into the same sp, 2 sc into each st around, join
Round 2: ch1, sc into the same sp *sc into the next st, 2 sc into the next st* rep around, join
Round 3: ch1, sc into the same sp *sc into the next st 2 sts, 2 sc into the next st* rep around, join
Round 5: ch1, sc into the same sp *sc into the next st 4 sts, 2 sc into the next st* rep around, join
Rounds 6-9: ch1, sc into each sp around, join, turn
Round 10: ch1, fpsc around each st around, join turn
Round 11: ch1, sc around, join
Repeat Round 11 until your basket is the desired height.
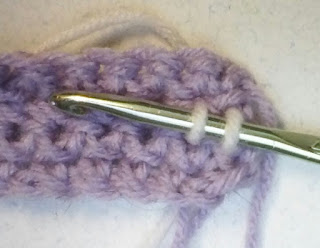
Decoration Detail (optional) With 2 strands of yarn surface crochet around the posts of the last row.
How to Crochet a Magic Ring
This is a great way to begin a crochet in the round project. It makes a nice tight center with no gap.
Step 1: Wrap the yarn around your index and middle fingers.
Step 2: Insert the hook under both strands of yarn, yarn over and pull through the ring, chain 1.
Step 3: Work the appropriate number of stitches around the 2 strands of yarn.
Step 4: Pull the loose tail until the first and last stitches meet, slip stitch into the chain 1 to join.
How to Use the Invisible Join Technique
Work the correct number of stitches in the pattern, and then work 1 more stitch into the same space as the beginning chain. Join into the first crocheted stitch (the stitch directly to the left of the beginning chain). This hides the beginning chain and creates a nice tight seam which is almost invisible.
How to Surface Crochet
Step 1: Hold the yarn in the back of the fabric. Insert the hook and pull a loop through the stitches.
Step 2: Insert the yarn into the fabric and pull the yarn through the fabric.
Step 3: Pull the yarn through the loop on the hook.
Repeat Steps 2 and 3 until you complete the surface crochet.
Step 4: Pull the yarn up in a long loop, remove the hook, insert it from the back to the front and pull the loop through to the back of the fabric and join into the back of the stitches.
I hope you like this pattern and have fun crocheting your own baskets to tame your stash and hold items. You can adjust the size of the basket by reducing or adding rounds to the base and sides.
With all my patterns you may feel free to sell any items you make with them as long as you give me credit as the designer. If you'd like to share this pattern, please share the link to this blog or the pattern on my Raverly page.
Please post any pics of projects you make with this pattern, I'd love to see them! Feel free to ask questions, or if you find any mistakes in the pattern. Thanks for stopping by, until next time take care and keep on hooking!


No comments:
Post a Comment